| Chapter III. USB drive modifications | ||
|---|---|---|
 |  | |
| Chapter III. USB drive modifications | ||
|---|---|---|
| | | |
Table of Contents
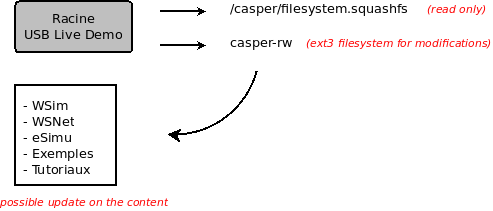
For more confort, our work will be based on a copy of the file system which will be copied block to block on the hard drive instead of the flash drive (better access time Read/Write)
$ sudo dd if=/dev/sda1 of=usb_demo_wsim.raw bs=512
The use of Chroot command allows administration of inactive operating system with your system in order to not increase size of your flash drive system. Work and download directories (for apt-get or aptitude) are on your active system, not on the target system.
Filesystem "filesystem.squash" decompression and its modification with Chroot allow to have an effect on live version executed on USB Key and on installable version. So the installation of your distribution stays identical to your "demo" version.
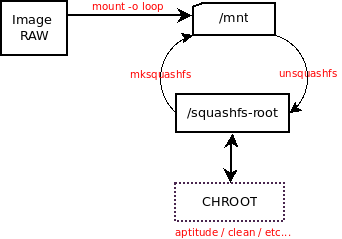
Below, a summary of how work a live/installable version (Ubuntu) :
First, in order to modify filesystem, you must mount RAW image in a directory :
$ sudo mount -o loop image.raw mnt
Then, you must uncompress filesytem with unsquashfs command
$ sudo unsquashfs mnt/casper/filesystem.squashfs
Once the filesystem has been unpacked in /squashfs-root directory, we just have to do Chroot without forgetting to copy host network configuration.
$ sudo cp /etc/resolv.conf /mnt/etc/

$ sudo mount /dev/    /mnt/dev      -o bind
$ sudo mount /dev/pts /mnt/dev/pts  -o bind
$ sudo mount /proc    /mnt/proc     -o bind
$ sudo mount /sys     /mnt/sys      -o bind
$ sudo chroot squashfs-root
![[Note]](admon/note.png) | Chroot mode |
|---|---|
From now on, all commands executed will be executed under chroot mode, that is to say on your target file system.
Make sure you have |
lsof)exit command
 $ sudo umount /mnt/sys
 $ sudo umount /mnt/proc
 $ sudo umount /mnt/dev/pts
 $ sudo umount /mnt/dev
When modifications are finished, we just have to recompress filesystem and copy it in the right place in mounted RAW image on /mnt
$ sudo mksquashfs squashfs-root mnt/casper/filesystem.squashfs
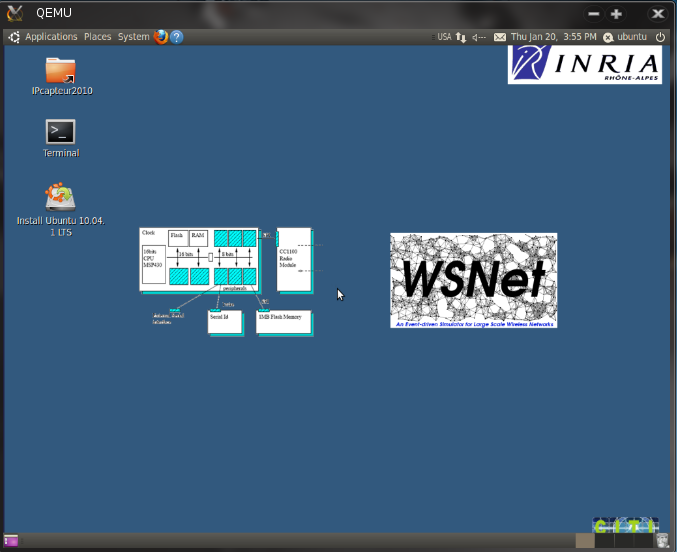
QEMU is a processor emulator that relies on dynamic binary translation to achieve a reasonable speed while being easy to port on new host CPU architectures. So, we can boot on RAW image previously created to validate content of customized distribution.
| Remark |
|---|---|
There is a graphical user interface for Qemu named Qemu-launcher |
Below, there is an example of Qemu utilisation with RAW image :
| | | |
| Chapter II. Live USB bootable drive |  | Chapter IV. Virtualization |